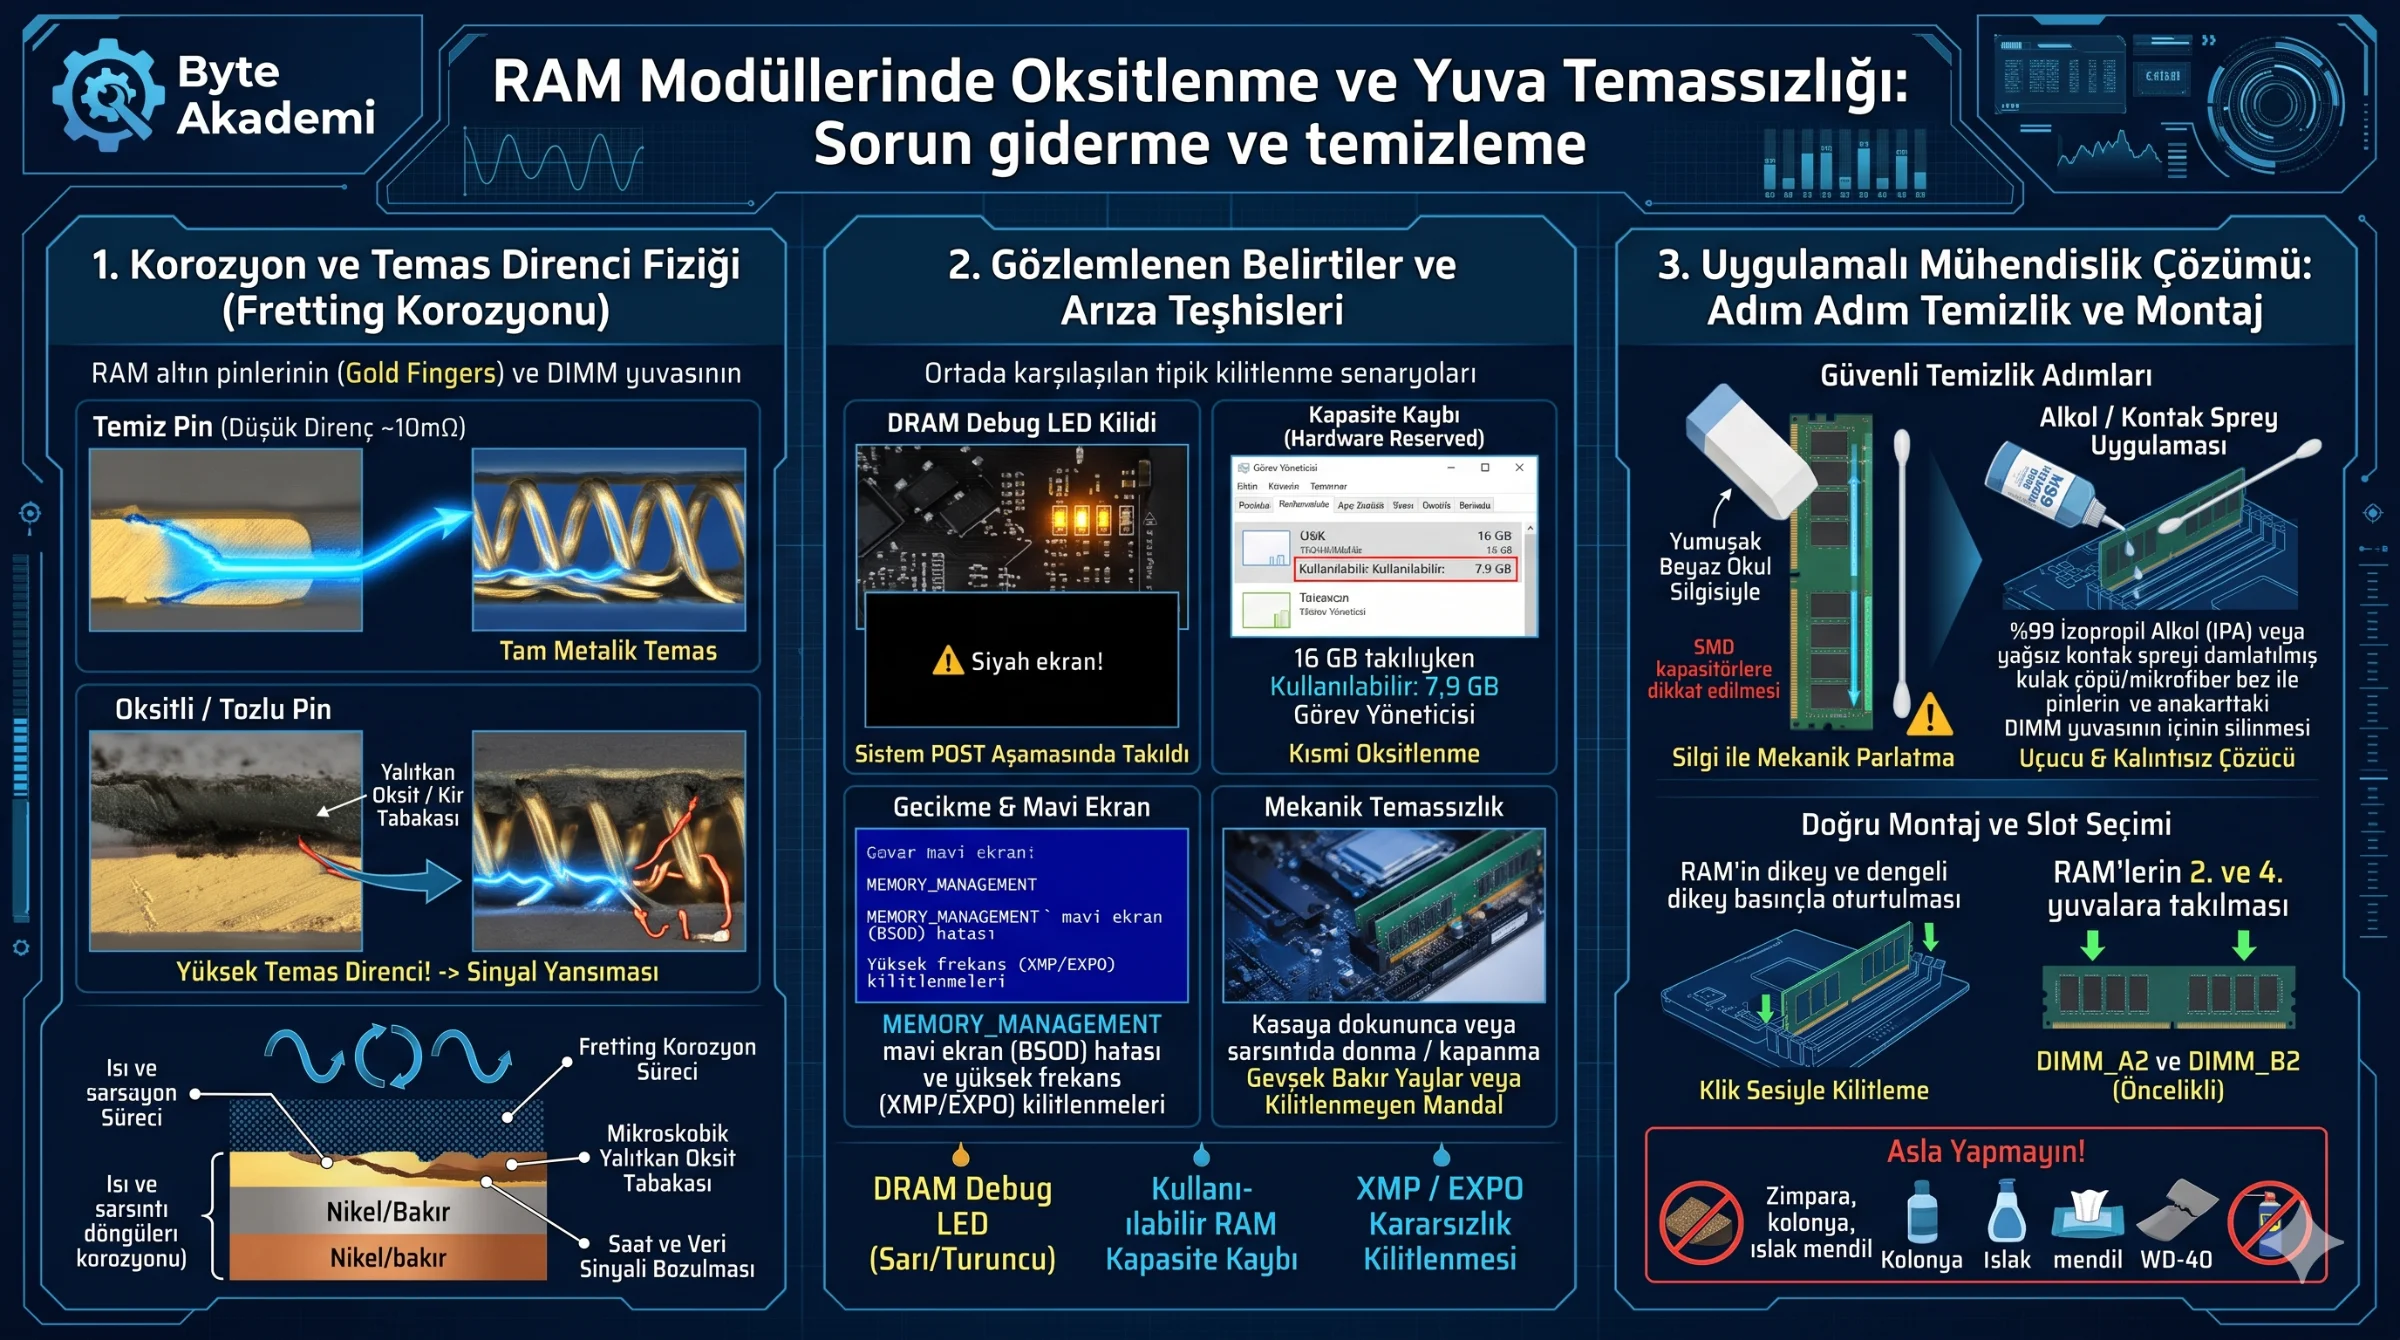
Pressing the power button only to watch chassis fans spin at full RPM while the monitor stays black and the motherboard's amber DRAM Debug LED remains lit—or seeing Windows report "16.0 GB (7.9 GB Usable)" alongside sudden MEMORY_MANAGEMENT BSODs—often tricks users into replacing perfectly healthy memory kits. In roughly 80% of cases, the DRAM chips are intact; the culprit is microscopic contact oxidation and mechanical seating resistance inside the DIMM slots.
RAM contact oxidation and slot seating faults are resolved by mechanically polishing the module's gold-plated edge connectors ("gold fingers") with a soft white rubber eraser and flushing the motherboard DIMM slots with 99% isopropyl alcohol (IPA) or residue-free electronic contact cleaner. Afterward, reseat modules firmly into slots A2 and B2 (2nd and 4th slots) using even vertical pressure until the retention latches snap shut with an audible click.
Table of Contents
- 1. Gold Doesn't Rust, So Why Does RAM Oxidize? Fretting Corrosion Physics
- 2. High-Frequency Sensitivity: How Microscopic Film Disrupts DDR4 & DDR5
- 3. RAM Oxidation & Slot Contact Symptom Diagnostic Matrix
- 4. Applied Engineering Guide: Step-by-Step RAM & DIMM Slot Restoration
- 5. Four Hardware-Destroying Mistakes to Avoid During Cleaning
- 6. Frequently Asked Questions (FAQ)
Pure gold never rusts, yet thermal expansion micro-motion triggers fretting corrosion that exposes underlying nickel—often resolved in seconds with a soft rubber eraser rather than buying new memory.
1. Gold Doesn't Rust, So Why Does RAM Oxidize? Fretting Corrosion Physics
While pure gold resists oxidation, the 288 edge pins on DDR4 and DDR5 modules use an ultra-thin (~0.75 micron) gold flash plated over nickel and copper substrates. Repeated thermal expansion and contraction cycles inside a PC chassis induce microscopic sliding between DIMM pins and socket springs—a phenomenon known as Fretting Corrosion. This wears away the thin gold layer, exposing underlying nickel to atmospheric moisture and sulfur to form an insulating oxide film.
  [RAM GOLD PIN & DIMM SOCKET CONTACT RESISTANCE PHYSICS]

  Clean Contact (~10 Milliohms):
  [ DIMM Socket Spring ] =====(Clean Metallic Path - Crisp 0/1 Pulses)=====> [ RAM Gold Pin ]

  Oxidized / Contaminated Contact (Signal Reflection):
  [ DIMM Socket Spring ] ──/── [ Insulating Oxide / Oil Film ] ──/──> [ RAM Gold Pin ]
                           └─> Voltage Drop & DRAM Debug LED Lockup!
2. High-Frequency Sensitivity: How Microscopic Film Disrupts DDR4 & DDR5
Operating at low voltages—1.2V–1.35V for DDR4 and 1.1V for DDR5—while switching billions of times per second (3200 MT/s to 7200+ MT/s), modern memory buses tolerate virtually zero added contact resistance. Even a few milliohms of oxide buildup introduces impedance mismatches and signal reflections, causing the CPU's Integrated Memory Controller (IMC) to abort Memory Training at boot.
3. RAM Oxidation & Slot Contact Symptom Diagnostic Matrix
| Observed Symptom | Technical Root Cause | Affected Pin Group | Definitive Fix |
|---|---|---|---|
| Fans spin, black screen, solid DRAM LED | Open circuit on clock or command/address lines | Center-notch control pins | Polish pins with eraser; test single stick in A2. |
| 16 GB installed, "7.9 GB Usable" in Windows | Partial oxidation reserving second channel to hardware | Data bus (DQ) pins on channel B | Clean second stick with eraser; reseat firmly in B2. |
| Fails to boot or crashes when XMP/EXPO enabled | Elevated resistance & noise at high transfer rates | VDD/VDDQ power & ground pins | Flush DIMM slot with 99% IPA; polish gold fingers. |
| Freezes when chassis is bumped or nudged | Loose retention latch or fatigued socket spring | Edge mechanical contacts | Reseat vertically until side latches click locked. |
4. Applied Engineering Guide: Step-by-Step RAM & DIMM Slot Restoration
  [STEP-BY-STEP RAM & DIMM SLOT RESTORATION PROTOCOL]

  STEP 1 (Power Isolation)   : Shut down, unplug AC power, and hold power button for 15 seconds.
  STEP 2 (Safe Removal)      : Unclip DIMM latches and pull modules straight up by top corners.
  STEP 3 (Eraser Polishing)  : Lay RAM flat on cardboard; gently rub gold pins vertically with
                               a soft white rubber eraser until dull tarnish turns bright gold.
  STEP 4 (99% IPA Flush)     : Brush away eraser crumbs, wipe pins and DIMM slots with 99%
                               isopropyl alcohol, and allow 2 minutes to evaporate completely.
  STEP 5 (Vertical Seating)  : Align center key notch in slots A2 and B2; press evenly with both
                               thumbs until retention latches snap closed automatically.
5. Four Hardware-Destroying Mistakes to Avoid During Cleaning
- Using Sandpaper or Metal Blades: Scraping strips away the 0.75-micron gold plating, exposing bare copper that corrodes permanently within days.
- Using Rubbing Alcohol (<90%), Cologne, or Acetone: Water, fragrance oils, and harsh solvents corrode pins or melt plastic DIMM housings; use only 99% IPA.
- Spraying Standard WD-40: Oil-based lubricants leave a sticky dust-trapping residue inside socket springs.
- Applying Hairdryer Heat: Excessive heat warps plastic DIMM slots and weakens spring contact tension.
6. Frequently Asked Questions (FAQ)
Can cleaning with an eraser damage the tiny SMD capacitors near the gold pins?
Yes, if rubbed recklessly sideways. Always lay the DIMM flat on a firm surface and stroke the eraser strictly along the bottom gold-finger strip away from the tiny brown SMD capacitors.
Why did my RAM speed reset to 2133 MHz or 4800 MHz after cleaning?
Removing memory modules prompts the motherboard BIOS to reset memory profiles to safe JEDEC defaults. Enter BIOS via DEL or F2 and re-enable your XMP (Intel) or EXPO (AMD) profile.
Can a bent copper contact pin inside a motherboard DIMM slot be repaired?
Minor misalignment can sometimes be gently nudged back into position using fine tweezers under magnification, though a snapped pin permanently disables that specific memory slot.